From few days i was working on some web based system where I had requirement to generate pdf files on the fly and I used iTextSharp library for this purpose.
I tested it was working fine on my local system, but problem came when I hosted my code on production server, I used Godaddy’s shared hosting server for this project.

This Problem showing me this error
“System.Security.SecurityException: That assembly does not allow partially trusted callers”

So I looked out for solution and found this thing and solved the problem.
Follow these steps :-
1. Download The source code of iTextSharp version which you are using
2. Modify attributes in AssemblyInfo.cs file.

add this single line of code in this file

[assembly: AllowPartiallyTrustedCallers]

also you need to import following header files

using System.Security;
using System.Security.Permissions;

3.Compile the DLL

Now copy the compiled DLL from bin of solution and upload to server where your project is hosted.

That’s it.

For more updates and such new code tricks visit codeios.net


Hi all, posting first blog post of the year, many great things happened last year and many great things to be happen this year.
From last few weeks me and one of my friend are working on iPhone app which uses Pixate for UI of the app. So i asked him to write about pixate framework. Below mentioned steps describes about on how to use this free framework to stylised your app.

Lets begin with introduction to Pixate.

Pixate is a free framework that lets you style your native iOS views with stylesheets. You can download this framework from http://www.pixate.com .

Why should we use pixate?
Picture1

Lets get our hands dirty with implementation of Pixate.
1.Download Pixate Framwork from http://pixate.com
2.Create a new Project in Xcode 5 with Single View Application
3.Open Pixate package and Drag & Drop Pixate.framework in the Project.
Picture2
Don’t forget to mark “Copy items into destination group’s folder” and Create groups for added added folders.
Picture3
4.Now add CoreText and QuartzCore frameworks in the bundle from Build Phases.
Picture4
5.Add “–ObjC” in other linker flags
Picture5
6.Open Storyboard and Drag a button on the respective View Controller. As you can see
there is no CSS Design at all.
Picture6
7. Now Create a New File within the Project. Select Others option from the Left Panel under
iOS section ,select Empty File and click Next . Named the file as default.css and press Create
Picture7Picture8Picture9
8. In default.css file you need to create a Class or /and ID for UIControl design.
For ex. Create a .btn class for a UIButton
Picture10

9. Select a UIControl and Add a new row under “user Defined Runtime Attributes”
Picture11

10. Double Click on keypath to begin editin and type “styleClass”.
Select type String and Class name that you have previously created in the default.css file.
Picture12
11. Run the App on Simulator/Device.

Picture13

So thats all about on getting started with pixate framework, Thanks to https://www.facebook.com/Kewl.Mathneja21 for taking spending some time to write about this framework.

Project created in the demonstration can be found here at the github repo of Baljeet Singh
https://github.com/baljeetSingh21/PixateRepo

Feel free to contact us if you find any difficulty while implementing this framework.
For more updates and such new code tricks visit codeios.net


There are number of operation which we can perform overs the date in objective-c like adding days to date, adding hours to date, date with days before now etc, Here is one cool utility kit available on GitHub which does all these operations for you, all you have to do is just add this to your project and you are ready to go with it.
Here are various operations, which you can perform with it, operation names are self-explanatory.

You can download the library from this link https://github.com/erica/NSDate-Extensions/blob/master/NSDate-Utilities.h
or you can download the project which i made using this library from my GitHub from this link https://github.com/malkitsingh/nsdateutilityapp

How to use it in Xcode:-
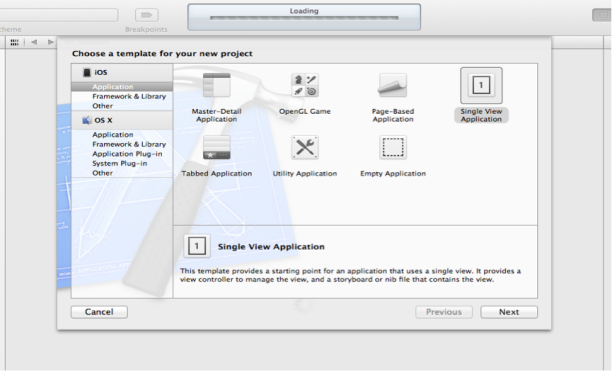
1. Open Xcode, and create a single view application, though we will not be using anything of iPhone screen to display (I’ll demonstrate this library using NSLog).

1

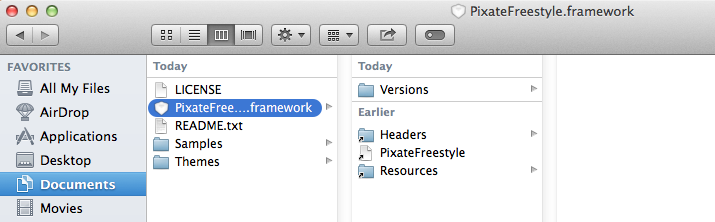
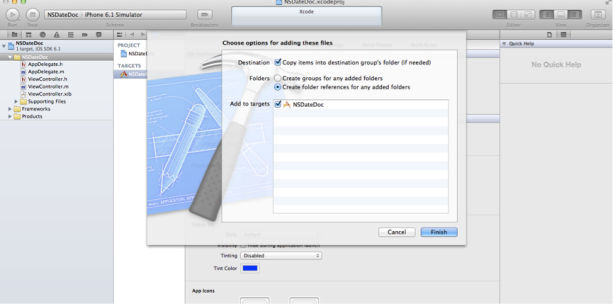
2. Drag and drop NSDate-Utilities.h and NSDate-Utilities.m file into your project.

2

Let’s begin with implementing this extension class.

• First of all import the NSDate-Extension library into your implementation file using this line of code

#import "NSDate-Utilities.h"

Methods in this class are grouped as their functionality.

First group is for Relative dates from the current date

1. dateTomorrow:- this function returns the tomorrows date and doesn’t expects any argument.


        - (void)viewDidLoad
  {
        [super viewDidLoad];
   
   NSDateFormatter *dateFormatter = [[NSDateFormatter alloc] init];
    [dateFormatter setDateFormat:@"MMM dd, yyyy"];
    NSDate *date = [NSDate date];
    NSDate *dateTomorrow = [NSDate dateTomorrow];
    NSString *formattedDateString = [dateFormatter stringFromDate:date];
        NSString *formattedDateStringTomorrow = [dateFormatter      stringFromDate:dateTomorrow];
   NSLog(@"Todays Date is %@",formattedDateString );
    NSLog(@"Tomorrows Date is %@",formattedDateStringTomorrow );
  
}

2. dateYesterday:– this returns yesterdays as its name suggests.


       - (void)viewDidLoad
  {
     [super viewDidLoad];
     NSDateFormatter *dateFormatter = [[NSDateFormatter alloc] init];
     [dateFormatter setDateFormat:@"MMM dd, yyyy"];
     NSDate *date = [NSDate date];
     NSDate *dateYest = [NSDate dateYesterday];
     NSString *formattedDateString = [dateFormatter stringFromDate:date];
        NSString *formattedDateStringyest = [dateFormatter     stringFromDate:dateYest];
   NSLog(@"Todays Date is %@",formattedDateString );
    NSLog(@"Yesterdays Date was %@",formattedDateStringyest );
  
}

3. + (NSDate *) dateWithDaysFromNow:- (NSInteger) days;- This function returns date by adding no. of days in date of today.


          - (void)viewDidLoad
      {
            [super viewDidLoad];
           NSDateFormatter *dateFormatter = [[NSDateFormatter alloc] init];
           [dateFormatter setDateFormat:@"MMM dd, yyyy"];
           NSDate *date = [NSDate date];
          NSDate *dateAfternDays = [NSDate dateWithDaysFromNow:2];
          NSString *formattedDateString = [dateFormatter stringFromDate:date];
          NSString *formattedDateAfternDays = [dateFormatter     stringFromDate:dateAfternDays];
         NSLog(@"Todays Date is %@",formattedDateString );
        NSLog(@"Date After 2 days will be%@",formattedDateAfternDays );
  
}

4. + (NSDate *) dateWithDaysBeforeNow:-(NSInteger) days; This function does reverse of datewithdaysfromnow, it provides date by subtracting given days from it.


          - (void)viewDidLoad
   {
          [super viewDidLoad];
          NSDateFormatter *dateFormatter = [[NSDateFormatter alloc] init];
          [dateFormatter setDateFormat:@"MMM dd, yyyy"];
          NSDate *date = [NSDate date];
          NSDate *dateBeforenDays = [NSDate dateWithDaysBeforeNow:2];
          NSString *formattedDateString = [dateFormatter stringFromDate:date];
          NSString *formattedBeforenDays = [dateFormatter                stringFromDate:dateBeforenDays];
         NSLog(@"Todays Date is %@",formattedDateString );
         NSLog(@"Date Before 2 days was %@",formattedBeforenDays );
  
}

5. dateWithHoursFromNow :- This function returns us a date by adding no. of hours which we specify.


          - (void)viewDidLoad
        {
            [super viewDidLoad];
            NSDateFormatter *dateFormatter = [[NSDateFormatter alloc] init];
            [dateFormatter setDateFormat:@"MMM dd, yyyy"];
           NSDate *date = [NSDate date];
           NSDate *dateAfternHoursFromNow = [NSDate dateWithHoursFromNow:20];
           NSString *formattedDateString = [dateFormatter stringFromDate:date];
           NSString *formattedAfternHoursFromNow = [dateFormatter  stringFromDate:dateAfternHoursFromNow];
            NSLog(@"Todays Date is %@",formattedDateString );
          NSLog(@"Date After 20 hours from now will   %@",formattedAfternHoursFromNow );
  
}

6. + (NSDate *) dateWithHoursBeforeNow: (NSInteger) dHours;- This functions returns date by subtracting given no. of hours from todays date.


         - (void)viewDidLoad
    {
           [super viewDidLoad];
           NSDateFormatter *dateFormatter = [[NSDateFormatter alloc] init];
           [dateFormatter setDateFormat:@"MMM dd, yyyy"];
          NSDate *date = [NSDate date];
          NSDate *dateBeforenHoursFromNow = [NSDate   dateWithHoursBeforeNow:20];
        NSString *formattedDateString = [dateFormatter stringFromDate:date];
        NSString *formattedBeforenHoursFromNow = [dateFormatter  stringFromDate:dateBeforenHoursFromNow];
         NSLog(@"Todays Date is %@",formattedDateString );
         NSLog(@"Date Before 20 hours from now was  %@",formattedBeforenHoursFromNow );
  
      }

7. dateWithMinutesFromNow :- as its name suggests, this function returns a date by adding given no. of minutes to it.


        - (void)viewDidLoad
      { 
    	[super viewDidLoad];
   	NSDateFormatter *dateFormatter = [[NSDateFormatter alloc] init];
    	[dateFormatter setDateFormat:@"MMM dd, yyyy"];
   	 NSDate *date = [NSDate date];
    NSDate *dateAfternMinutesFromNow = [NSDate dateWithMinutesFromNow:5000];
    	NSString *formattedDateString = [dateFormatter stringFromDate:date];
   NSString *formattedAfternMinutesFromNow = [dateFormatter  stringFromDate:dateAfternMinutesFromNow];
             NSLog(@"Todays Date is %@",formattedDateString );
           NSLog(@"Date After 5000 minutess from now will be   %@",formattedAfternMinutesFromNow );
  
}

8. dateWithMinutesBeforeNow:– This functions returns a date from now by subtracting given no. of minutes from it.


 - (void)viewDidLoad
   {
        [super viewDidLoad];
        NSDateFormatter *dateFormatter = [[NSDateFormatter alloc] init];
       [dateFormatter setDateFormat:@"MMM dd, yyyy"];
       NSDate *date = [NSDate date];
       NSDate *dateBeforenMinutesFromNow = [NSDate       dateWithMinutesFromNow:5000];
       NSString *formattedDateString = [dateFormatter stringFromDate:date];
       NSString *formattedBeforenMinutesFromNow = [dateFormatter   stringFromDate:dateBeforenMinutesFromNow]; 
     NSLog(@"Todays Date is %@",formattedDateString );
     NSLog(@"Date Before 5000 minutess from now was  %@",formattedBeforenMinutesFromNow );
  
}

Second group of function is for Comparing Dates:-

Almost every single function of this group returns Boolean result i.e. either true or false.

Let’s explore functions of this group.

1. isEqualToDateIgnoringTime: – this method returns us true or false by comparing two given dates.


 - (void)viewDidLoad
 {
    [super viewDidLoad];
    NSDate *date = [NSDate date];
    NSDate *dateBeforenMinutesFromNow = [NSDate dateWithMinutesFromNow:5000];
    if([date isEqualToDateIgnoringTime:dateBeforenMinutesFromNow])
   NSLog(@"Two dates are equal");
    else
    NSLog(@"Two Dates are not equal");
}

2. – (BOOL) isTomorrow; – This function returns true or false based on result of is given date is tomorrows date or not.


   - (void)viewDidLoad
{
    [super viewDidLoad];
    NSDate *date = [NSDate date];
     if([date isTomorrow])
   NSLog(@"yes its tomorrow");
    else
    NSLog(@"no its not tomorrow");
}

3. – (BOOL) isYesterday;- This function returns a result and confirms if given date is yesterday’s date.


          - (void)viewDidLoad
     {
          [super viewDidLoad];
          NSDate *date = [NSDate date];
          if([date isYesterday])
          NSLog(@"yes its yesterdays date");
          else
          NSLog(@"no its not yesterdays date");
  
}

4. – (BOOL) isToday; – This function returns true if given date is todays date else returns false.


    - (void)viewDidLoad
{
      [super viewDidLoad];
      NSDate *date = [NSDate date];
   
      if([date isToday])
      NSLog(@"yes its todays date");
     else
     NSLog(@"no its not todays date");
}

5. – (BOOL) isSameWeekAsDate: (NSDate *) aDate;- This function compares two given dates and checks if both of these dates are of same week, if yes then it returns true else returns false.


- (void)viewDidLoad
{
    [super viewDidLoad];
    NSDate *date = [NSDate date];
    NSDate *dateBeforenMinutesFromNow = [NSDate dateWithMinutesFromNow:5000];

    if([date isSameWeekAsDate:dateBeforenMinutesFromNow])
   NSLog(@"yes its same week as given date");
    else
    NSLog(@"no its not same week as given date");
}

6. – (BOOL) isThisWeek;- This function checks if the given date is from same week of system.


        - (void)viewDidLoad
 {
         [super viewDidLoad];
         NSDate *date = [NSDate date];
         if([date isThisWeek])
        NSLog(@"yes given date is from same week");
         else
        NSLog(@"no given date is not from same week");
} 

7. – (BOOL) isNextWeek; – This function checks, if given date is from next week or not.


            - (void)viewDidLoad
       {
              [super viewDidLoad];
              NSDate *date = [NSDate date];
              if([date isNextWeek])
             NSLog(@"yes given date is from next week");
             else
             NSLog(@"no given date is not from next week");
}

8. – (BOOL) isLastWeek; – This function checks if given date is from last week of the month.


     - (void)viewDidLoad
    {
      [super viewDidLoad];
      NSDate *date = [NSDate date];
  if([date isLastWeek])
  NSLog(@"yes given date is from last weak of month");
   else
        NSLog(@"no given date is not from last weak of month");
}

9. – (BOOL) isSameMonthAsDate: (NSDate *) aDate;- This function checks , if the given date is from same month of date with which it is being compared.


	- (void)viewDidLoad
         {
    	[super viewDidLoad];
    	NSDate *date = [NSDate date];
    	NSDate *dateBeforenMinutesFromNow = [NSDate dateWithMinutesFromNow:5000];

    	if([date isSameMonthAsDate:dateBeforenMinutesFromNow])
  	 NSLog(@"yes given date is from same month");
    	else
   	 NSLog(@"no given date is not from same month");
}

DATE ROLES GROUP

1. isTypicallyWorkday: – This function returns us a true if the given date is a working day of week (it assumes there are 7 days in week, and on Saturday and Sunday its not a working day.)


    - (void)viewDidLoad
{
    [super viewDidLoad];
    NSDate *date= [NSDate date];
    if([date isTypicallyWorkday])
        NSLog(@"workday");
    else
        NSLog(@"holiday");
}

2. isTypicallyWeekend:- This function returns us true if given date falls in weekend and otherwise it gives us false.


    - (void)viewDidLoad
{
    [super viewDidLoad];
    NSDate *date= [NSDate date];
    if([date isTypicallyWeekend])
        NSLog(@"hurrey, its weekend");
    else
        NSLog(@"no its not weekend");
}

Another group comes after roles group is adjusting dates, functions of this group adds or subtracts days, hours and minutes from the given date.

1. – (NSDate *) dateByAddingDays: (NSInteger) dDays:- This function gives us date by adding given no. of days into date.


     - (void)viewDidLoad
{
      [super viewDidLoad];
     NSDateFormatter *formatter = [[NSDateFormatter alloc] init];
    [ formatter setDateStyle:NSDateFormatterMediumStyle];
    
     //get the date today
     NSString *dateToday = [formatter stringFromDate:[[NSDate date]   dateByAddingDays:2]];
    NSLog(@"Date by adding 2 days in todays date is %@",dateToday);
}

2. – (NSDate *) dateBySubtractingDays: (NSInteger) dDays; this function returns us a date by subtracting given no. of days from the date.


    - (void)viewDidLoad
{
     [super viewDidLoad];
    NSDateFormatter *formatter = [[NSDateFormatter alloc] init];
    [formatter setDateStyle:NSDateFormatterMediumStyle];
    
    //get the date today
    NSString *dateToday = [formatter stringFromDate:[[NSDate date] dateBySubtractingDays:2]];
    NSLog(@"Date by subtacting 2 days from todays date was %@",dateToday);
 
}

3. – (NSDate *) dateByAddingHours: (NSInteger) dHours; this function returns us a date by adding a given number of hours in it.


  - (void)viewDidLoad
{
    [super viewDidLoad];
    NSDateFormatter *dateFormat = [[NSDateFormatter alloc] init];
    [dateFormat setDateFormat:@"yyyy-MM-dd"];
    NSDate *date = [[NSDate date] dateByAddingHours:100];
    NSString *theDate = [dateFormat stringFromDate:date];      
    NSLog(@"date by adding 100 hours in todays date is %@",theDate);
}

4. – (NSDate *) dateBySubtractingHours: (NSInteger) dHours;
This function returns us a date by subtracting given no. of hours from the date.


   - (void)viewDidLoad
{
    [super viewDidLoad];
    NSDateFormatter *dateFormat = [[NSDateFormatter alloc] init];
    [dateFormat setDateFormat:@"yyyy-MM-dd"];
    NSDate *date = [[NSDate date] dateBySubtractingHours:100];
    NSString *theDate = [dateFormat stringFromDate:date];      
    NSLog(@"date by subtracting 100 hours from todays date was %@",theDate);
}

5. (NSDate *) dateByAddingMinutes: (NSInteger) dMinutes;
This function gives us a date by adding given no. of minutes into it.


    - (void)viewDidLoad
{
    [super viewDidLoad];
    NSDateFormatter *dateFormat = [[NSDateFormatter alloc] init];
    [dateFormat setDateFormat:@"yyyy-MM-dd"];
    NSDate *date = [[NSDate date] dateByAddingMinutes:10000];
    NSString *theDate = [dateFormat stringFromDate:date];      
    NSLog(@"date by adding 10000 minutes in todays date is %@",theDate);
}

6. – (NSDate *) dateBySubtractingMinutes: (NSInteger) dMinutes;- This function returns us a date by subtracting given no. of minutes from the date we specify.


       - (void)viewDidLoad
  {
       [super viewDidLoad];
      NSDateFormatter *dateFormat = [[NSDateFormatter alloc] init];
     [dateFormat setDateFormat:@"yyyy-MM-dd"];
     NSDate *date = [[NSDate date] dateBySubtractingMinutes:10000];
     NSString *theDate = [dateFormat stringFromDate:date];      
     NSLog(@"date by subtracting 10000 minutes from todays date was %@",theDate);

}

7. – (NSDate *) dateAtStartOfDay; this function returns us the date which was there at the start of the given date.


      - (void)viewDidLoad
{
        [super viewDidLoad];
       NSDateFormatter *dateFormat = [[NSDateFormatter alloc] init];
       [dateFormat setDateFormat:@"yyyy-MM-dd"];
       NSDate *date = [[NSDate date] dateAtStartOfDay];
       NSString *theDate = [dateFormat stringFromDate:date];      
       NSLog(@"date at start of the todays date was %@",theDate);

}

Another group which comes after adjusting dates group is retrieving interval group, all the functions in this group returns us the integer values which can be minutes, hours, days before or after from the given date.

1. – (NSInteger) minutesAfterDate: (NSDate *) aDate:- This function gives us the no. of minutes which are passed after the given date.


    - (void)viewDidLoad
{
    [super viewDidLoad];
    NSDateFormatter *dateFormat = [[NSDateFormatter alloc] init];
    [dateFormat setDateFormat:@"yyyy-MM-dd"];
    NSDate *datePrevious = [[NSDate date] dateBySubtractingMinutes:1000];

    NSDate *dateToday = [NSDate date];

    NSLog(@"Minutes spent after subtracting 1000 minutes from todays date are %d",[dateToday minutesAfterDate:datePrevious]);

}

2. – (NSInteger) minutesBeforeDate: (NSDate *) aDate:- This function returns us the minutes remaining before the given date.


       - (void)viewDidLoad
   {
      [super viewDidLoad];
      NSDateFormatter *dateFormat = [[NSDateFormatter alloc] init];
      [dateFormat setDateFormat:@"yyyy-MM-dd"];
      NSDate *dateFuture = [[NSDate date] dateByAddingMinutes:1000];

    NSDate *dateToday = [NSDate date];

    NSLog(@"Minutes left before date are %d",[dateToday minutesBeforeDate:dateFuture]);

}

3. – (NSInteger) hoursAfterDate: (NSDate *) aDate:- This function returns us no. of hours spent after the date.


    - (void)viewDidLoad
{
    [super viewDidLoad];
    NSDateFormatter *dateFormat = [[NSDateFormatter alloc] init];
    [dateFormat setDateFormat:@"yyyy-MM-dd"];
    NSDate *dateFuture = [[NSDate date] dateBySubtractingHours:100];

    NSDate *dateToday = [NSDate date];

    NSLog(@"Hours after date are %d",[dateToday hoursAfterDate:dateFuture]);

}

4. – (NSInteger) hoursBeforeDate: (NSDate *) aDate:- This function return us the no. of hours remaining in given date.


           - (void)viewDidLoad
      {
            [super viewDidLoad];
            NSDateFormatter *dateFormat = [[NSDateFormatter alloc] init];
           [dateFormat setDateFormat:@"yyyy-MM-dd"];
          NSDate *dateFuture = [[NSDate date] dateByAddingHours:100];

           NSDate *dateToday = [NSDate date];

            NSLog(@"Hours left before date are %d",[dateToday                    hoursBeforeDate:dateFuture]);

}

5. – (NSInteger) daysAfterDate: (NSDate *) aDate;-This function returns us no. of days spent after a given date.


            - (void)viewDidLoad
      {
           [super viewDidLoad];
           NSDateFormatter *dateFormat = [[NSDateFormatter alloc] init];
           [dateFormat setDateFormat:@"yyyy-MM-dd"];
           NSDate *dateFuture = [[NSDate date] dateBySubtractingDays:3];

            NSDate *dateToday = [NSDate date];

           NSLog(@"Days after date are %d",[dateToday daysAfterDate:dateFuture]);

}

6. – (NSInteger) daysBeforeDate: (NSDate *) aDate; this function return us no. of days remaining in given date from the reference date.


          - (void)viewDidLoad
       {
          [super viewDidLoad];
           NSDateFormatter *dateFormat = [[NSDateFormatter alloc] init];
            [dateFormat setDateFormat:@"yyyy-MM-dd"];
            NSDate *dateFuture = [[NSDate date] dateByAddingDays:3];
           NSDate *dateToday = [NSDate date];
          NSLog(@"Days left before date are %d",[dateToday daysBeforeDate:dateFuture]);

}

7. – (NSInteger)distanceInDaysToDate:(NSDate *)anotherDate:- This function returns us, distance between two dates in days.


      - (void)viewDidLoad
{
       [super viewDidLoad];
      NSDateFormatter *dateFormat = [[NSDateFormatter alloc] init];
      [dateFormat setDateFormat:@"yyyy-MM-dd"];
      NSDate *dateFuture = [[NSDate date] dateByAddingDays:30];
      NSDate *dateToday = [NSDate date]
     NSLog(@"Distance in days to date is %d days",[dateToday distanceInDaysToDate:dateFuture]);

}

And lot more like above mentioned methods, for any further details and updated on the library please visit the GitHub address which I mentioned above in this post.
For more updates and such new code tricks visit codeios.net
Happy coding!


So writing a blog post after a long time, was busy with projects and shopping.
Suppose you have a requirement to use SQLite database in your iOS app, then it can be tedious job to write no. of statements to access the database, you can use some tools like FMDB Framework which can make your life easier.
I came to know about this framework while i was working on some iPhone app which has lot of database dependencies.

So what FMDB framework is all about?
It’s a framework written in objective-c on top of SQLite.

you find more complete information about this framework at https://github.com/ccgus/fmdb

So lets get right into code on how to use this framework in your app.

Initial Setup

Add the SQLite DB like any other file in your application’s bundle then copy the database to documents directory using the following code then use the database from the documents directory

1 First download the FMDB framework
2 Extract the framework now copy all the file from src folder except fmdb.m to your project directory.
3 Click your project in the left column of XCode.
4 Click the main target in the middle column.
5 Click the “Build Phases” tab.
6 Expand the arrow next to “Link Binary With Libraries”.
7 Click the “+” button.
8 Search for libsqlite3.0.dylib and double click it.

Copying your existing database into app’s document in didFinishLaunchingWithOptions: and maintain the database path through out the application.

In your AppDelegate add the following code.

AppDelegate.m

#import "AppDelegate.h"

@implementation AppDelegate

// Application Start
- (BOOL)application:(UIApplication *)application didFinishLaunchingWithOptions:(NSDictionary *)launchOptions {

    // Function called to create a copy of the database if needed.
    [self createCopyOfDatabaseIfNeeded];

    return YES;
}

#pragma mark - Defined Functions

// Function to Create a writable copy of the bundled default database in the application Documents directory.
- (void)createCopyOfDatabaseIfNeeded {
    // First, test for existence.
    BOOL success;
    NSFileManager *fileManager = [NSFileManager defaultManager];
    NSError *error;
    NSArray *paths = NSSearchPathForDirectoriesInDomains(NSDocumentDirectory, NSUserDomainMask, YES);
    // Database filename can have extension db/sqlite.
    NSString *documentsDirectory = [paths objectAtIndex:0];
    NSString *appDBPath = [documentsDirectory stringByAppendingPathComponent:@"database-name.sqlite"];

    success = [fileManager fileExistsAtPath:appDBPath];
    if (success){
        return;
    }
    // The writable database does not exist, so copy the default to the appropriate location.
    NSString *defaultDBPath = [[[NSBundle mainBundle] resourcePath] stringByAppendingPathComponent:@"database-name.sqlite"];
    success = [fileManager copyItemAtPath:defaultDBPath toPath:appDBPath error:&error];
    if (!success) {
        NSAssert1(0, @"Failed to create writable database file with message '%@'.", [error localizedDescription]);
    }
}

Now how to use it to Select, Insert, Update and Delete data from database.

Select Query

#import "FMDatabase.h"

- (void)getAllData {
    // Getting the database path.
    NSArray  *paths = NSSearchPathForDirectoriesInDomains(NSDocumentDirectory, NSUserDomainMask, YES);
    NSString *docsPath = [paths objectAtIndex:0];
    NSString *dbPath = [docsPath stringByAppendingPathComponent:@"database-name.sqlite"];

    FMDatabase *database = [FMDatabase databaseWithPath:dbPath];
    [database open];
    NSString *sqlSelectQuery = @"SELECT * FROM tablename";

    // Query result 
    FMResultSet *resultsWithNameLocation = [database executeQuery:sqlSelectQuery];
    while([resultsWithNameLocation next]) {
        NSString *strID = [NSString stringWithFormat:@"%d",[resultsWithNameLocation intForColumn:@"ID"]];
        NSString *strName = [NSString stringWithFormat:@"%@",[resultsWithNameLocation stringForColumn:@"Name"]];
        NSString *strLoc = [NSString stringWithFormat:@"%@",[resultsWithNameLocation stringForColumn:@"Location"]];

        // loading your data into the array, dictionaries.
        NSLog(@"ID = %d, Name = %@, Location = %@",strID, strName, strLoc);
    }
    [database close];   
}

Insert Query

#import "FMDatabase.h"

- (void)insertData {

    // Getting the database path.
    NSArray  *paths = NSSearchPathForDirectoriesInDomains(NSDocumentDirectory, NSUserDomainMask, YES);
    NSString *docsPath = [paths objectAtIndex:0];
    NSString *dbPath = [docsPath stringByAppendingPathComponent:@"database-name.sqlite"];

    FMDatabase *database = [FMDatabase databaseWithPath:dbPath];
    [database open];    
    NSString *insertQuery = [NSString stringWithFormat:@"INSERT INTO user VALUES ('%@', %d)", @"Jobin Kurian", 25];
    [database executeUpdate:insertQuery];   
    [database close];
}

Update Query

- (void)updateDate {

    // Getting the database path.
    NSArray  *paths = NSSearchPathForDirectoriesInDomains(NSDocumentDirectory, NSUserDomainMask, YES);
    NSString *docsPath = [paths objectAtIndex:0];
    NSString *dbPath = [docsPath stringByAppendingPathComponent:@"fmdb-sample.sqlite"];

    FMDatabase *database = [FMDatabase databaseWithPath:dbPath];
    [database open];    
    NSString *insertQuery = [NSString stringWithFormat:@"UPDATE users SET age = '%@' WHERE username = '%@'", @"23", @"colin" ];
    [database executeUpdate:insertQuery];
    [database close];

}

Delete Query

#import "FMDatabase.h"

- (void)deleteData {

    // Getting the database path.
    NSArray  *paths = NSSearchPathForDirectoriesInDomains(NSDocumentDirectory, NSUserDomainMask, YES);
    NSString *docsPath = [paths objectAtIndex:0];
    NSString *dbPath = [docsPath stringByAppendingPathComponent:@"database-name.sqlite"];

    FMDatabase *database = [FMDatabase databaseWithPath:dbPath];
    [database open];
    NSString *deleteQuery = @"DELETE FROM user WHERE age = 25";
    [database executeUpdate:deleteQuery];   
    [database close];
}

Addition Functionality

#import "FMDatabase.h"
#import "FMDatabaseAdditions.h"

- (void)gettingRowCount {

    // Getting the database path.
    NSArray  *paths = NSSearchPathForDirectoriesInDomains(NSDocumentDirectory, NSUserDomainMask, YES);
    NSString *docsPath = [paths objectAtIndex:0];
    NSString *dbPath = [docsPath stringByAppendingPathComponent:@"database-name.sqlite"];

    FMDatabase *database = [FMDatabase databaseWithPath:dbPath];
    [database open];
    NSUInteger count = [database intForQuery:@"SELECT COUNT(field_name) FROM table_name"];
    [database close];
}

You can fetch data in many formats using this framework. Some are as follows:-

intForColumn
longForColumn
longLongIntForColumn
boolForColumn
doubleForColumn
stringForColumn
dateForColumn
dataForColumn
dataNoCopyForColumn
UTF8StringForColumnName
objectForColumnName

There are no. of things which you can do with this framework, for latest updates in framework visit the github repo which i shared above.
For more updates and such new code tricks visit codeios.net
Cheers!
I was enjoying this song while writing blog.


I wrote this article for my third weak assignment at coursera’s intro to music production course.

AUTOMATION PRACTICAL

So let’s get into practical, I have recorded two audio files which have sound of Acoustic guitar, on one track I have some lead, and on the other track I have chords. I will demonstrate the same using Logic Pro 9.

To get into automation screen, all you have to do is just press “A” from keyboard and you are done. Once you get into this automation screen, you can choose various settings which you can automate like Volume, Pan etc.

For the purpose of demonstration on how to implement the automation, I have automated the PAN effect on both the tracks, which is causing the lead part to all the way to right and chord part to all the way left in initial part, and then after that chord part all the way to left and lead part all the way to right (which is reverse of first half).

Here is screenshot of two audio tracks

Untitled

HOW SCREEN LOOKS WITH AUTOMATION TRACK, AFTER PRESSING “A” FROM KEYBOARD:-

Untitled2

As you can see in screenshot mentioned above, I have created automation using on both of tracks, and these automations are opposite to each others, when first track is panned completely to right then at the same time, the second track is panned completely to left. Which makes guitar lead absent in half of the time if you listen to the track with one speaker only.

Please use 2 channel speakers to check the effect.

FIRST LISTEN TO THIS TRACK WITHOUT AUTOMATION

Now check the same guitar riff with automation on it (I have automated the PAN on tracks).

CONCLUSION: Automation is wonderful thing and can give you surprises sometimes if used efficiently, one must use it carefully because sometimes it becomes difficult to identify where the problem is.

Thanks for your time on reading this article and listening to tracks I have shared. Feel free to leave me your comments and suggestions on malkit@ymail.com .
For more updates and such new code tricks visit codeios.net


This article I wrote for First Week assignment for the course(Introduction to Music Production).

I will be sharing my thoughts on how to record electric guitar without using amplifier, I will demonstrate this direct recording technique using peace of equipment’s which I have at my home.

LIST OF GEARS REQUIRED FOR THIS TECHNIQUE ARE:

1.       Electric guitar

2.      TRS cable.

3.      Behringer’s Guitar Link (USB recording device).

4.      A MacBook Pro laptop.

5.      JBL headphones.

6.      Quarter inch to 3.5 mm Converter.

When we strum the strings of guitar, guitar converts the string vibrations into electric signal which I capture and deliver to Guitar Link via ¼ inch TRS cable by connecting one end of ¼ inch TRS cable with guitar pickup and other end of wire with the Guitar Link.

HOW THIS ALL SETUP LOOKS LIKE:-

WP_000361

A CLOSE LOOK UP OF GUITAR LINK, AND ITS VARIOUS PARTS

WP_000354

INSIDE GUITAR LINK, THE SIGNALS RECEIVED FROM GUITAR ARE PROCESSED AS DIGITAL SIGNALS.

WP_000357


GUITAR LINK CONNECTION WITH MACBOOK VIA USB

WP_000363


And to connect my 3.5 mm headphone wire with Guitar Link audio output I used quarter inch to 3.5 mm converter.

WP_000359


And from Guitar link, these signals are sent to DAW, which in my case is Logic Pro 9 and it may be, differ in your case. Inside my DAW I have selected virtual amplifier, which processes the digital signals, and make it sound like real amplifier.

WP_000362


THERE ARE TWO WAYS I CAN HEAR BACK MY GUITAR AND THESE ARE:

I can hear back my guitar sound via computer sound card, through speakers attached with my computer.

I can hear back my guitar sound through Guitar Link audio output channel. (To enable this option, you may need to check your logic or DAW preferences.)

NOTE: Use Guitar Link type of gears only for practice purpose or in any case if you do not have any good interface to connect with

your DAW. Because these type of gears cannot provide you good sound quality.

For more updates and such new code tricks visit codeios.net


hi, few days back when i was learning on RoR , then while entering data into database i came across this problem ”
MassAssignmentSecurity::Error: Can’t mass-assign protected attributes”.

Though this is not a big task to deal with, but for any beginner like me, its a big thing to resolve. Here are the tricks on how to solve this, i tried several different ways to solve this.

1. First i tried commenting few lines in config>environments>development.rb 

i commented this line,

config.active_record.mass_assignment_sanitizer = :strict

but this didn’t worked for me, and then i googled this problem and got solution from someones answer at stack overflow, this process was making change in certain piece of code, so here is the another process.

2. Goto following file config>application.rb and find the following line of code

config.active_record.whitelist_attributes = true

and set it to false like this

config.active_record.whitelist_attributes = false

and thats it, you are done.
For more updates and such new code tricks visit codeios.net


In this tutorial I will be sharing with you on how to use NSUserDefaults in iOS programming, so lets get started with knowing what is NSUSerDefaults.

What is NSUserDefaults ?

With the NSUserDefaults class, you can save settings and properties related to application or user data. For example, you could save a profile image set by the user or a default color scheme for the application. The objects will be saved in what is known as the iOS “defaults system”. The iOS defaults system is available throughout all of the code in your app, and any data saved to the defaults system will persist through application sessions. This means that even if the user closes your application or reboots their phone, the saved data will still be available the next time they open the app.

How to use this class:

First of all create a new project and make some UI designfor your app, App which I will be demonstrating here has two buttons and a label as shown in diagram, when I press the save button it save in database some name, and when I press the show it shows me the output in label.

iOS Simulator Screen shot 29-Jun-2013 10.18.47 AM

Code to save in NSUSerDefaults

Here is the code which you can use to save data using NSUserDefaults

NSUserDefaults *de= [NSUserDefaults standardUserDefaults];

[de setObject:@"malkit" forKey:@"firstName"];

NSLog(@"Data Saved");

What it does is, it creates a key-value pair for storage, and for key I have given identifier called “firstName” and in the value of that key I have written “malkit” – my name.

Now this will store this key-value pair into default’s database. And will be available through out the code of app.

Code to read back from NSUserDefaults

Here is the code which you can use to read back from NSUserDefaults.

NSUserDefaults *de= [NSUserDefaults standardUserDefaults];
[display setText:[de objectForKey:@"firstName"]];

here ‘display’ is a label outlet which I  created earlier to display content on screen.

And that’s it, NSUSerDefaults are easy to use and have no. of benefits like these are cached storages which mean these are fast.

It also has no. of limitations like, you can use it to store data of only limited data types like :

    1. NSData
    2. NSString
    3. NSNumber
    4. NSDate
    5. NSArray
    6. NSDictionary

Though if you want to store some other data types, then you can wrap that in one if these data types.
For more updates and such new code tricks visit codeios.net


What is Geocoding and reverse Geocoding?

GEOCODE (Geospatial Entity Object Code) is a standardized all-natural number representation format specification for geospatial coordinate measurements that provide details of the exact location of geospatial point at, below, or above the surface of the earth at a specified moment of time.

And reverse geocoding is the process of back (reverse) coding of a point location (latitude, longitude) to a readable address or place name.

Sometime we need to store users Latitude and Longitude information in database so that we can mark them on MAP or for some other purpose.

Here I am sharing a code snippet which I used for getting Latitude and Longitude information for the address which user used while registration on my site.

To do this I am using Json.Net library which is helpful for getting objects from Json data which is returned by the Google Maps API.

You can download Json.Net package from http://james.newtonking.com/projects/json-net.aspx and http://json.codeplex.com/

Once downloaded, add extract the required framework version which you are working on. And copy the Newtonsoft.Json.dll into bin directory of your project, and add its reference as well.

Once you finish with adding references, add these name spaces into your web page.

using System.IO;
using System.Net;
using Newtonsoft.Json.Linq;

Finally, code to get the latitude and longitude for given location, which I am getting from some textbox.

var request = HttpWebRequest.Create(@"http://maps.googleapis.com/maps/api/geocode/json?address=" + txtfellowshipcountry.Text.Trim().ToString()+ "&sensor=false");
// to get fixed location you can use it as
// var request = //HttpWebRequest.Create(@"http://maps.googleapis.com/maps/api/geocode/json?address=Jalandhar&sensor=false");

request.Method = "GET";
var response = request.GetResponse();
using (var stream = response.GetResponseStream())
            {
                using (var reader = new StreamReader(stream))
                {
                    var result = JObject.Parse(reader.ReadToEnd());

                    var lat = (float)result.SelectToken("results[0].geometry.location.lat");
                    var lng = (float)result.SelectToken("results[0].geometry.location.lng");
                }
            }

And that’s it, you are done with getting latitude and longitude for the given string.
For more updates and such new code tricks visit codeios.net


There are several keyboard combinations that can be used to take screenshots in Mac OS X. The SystemUIServer process handles these commands.
Shortcuts

  1. Command-Shift-3: Take a screenshot of the screen, and save it as a file on the desktop
  2. Command-Shift-4, then select an area: Take a screenshot of an area and save it as a file on the desktop
  3. Command-Shift-4, then space, then click a window: Take a screenshot of a window and save it as a file on the desktop
  4. Command-Control-Shift-3: Take a screenshot of the screen, and save it to the clipboard
  5. Command-Control-Shift-4, then select an area: Take a screenshot of an area and save it to the clipboard
  6. Command-Control-Shift-4, then space, then click a window: Take a screenshot of a window and save it to the clipboard

In Leopard and later, the following keys can be held down while selecting an area (via Command-Shift-4 or Command-Control-Shift-4):

  1. Space, to lock the size of the selected region and instead move it when the mouse moves
  2. Shift, to resize only one edge of the selected region
  3. Option, to resize the selected region with its center as the anchor point

Formats
Different versions of Mac OS X have different formats for screenshots.

Mac OS X 10.2 (Jaguar): jpg
Mac OS X 10.3 (Panther): pdf
Mac OS X 10.4 (Tiger) and later: png

In Mac OS X 10.4 and later, the default screenshot format can be changed, by opening Terminal (located at /Applications/Utilities/Terminal) and typing in:

defaults write com.apple.screencapture type image_format
killall SystemUIServer

Where image_format is one of jpg, tiff, pdf, png, bmp or pict (among others). If you omit the second line, you will need to log out and in again for the change to take effect.
For more updates and such new code tricks visit codeios.net